
STUV 6 Wood-Burning Insert Installation in Hawthorn Woods
By Chimney Monkey · Last updated · Hawthorn Woods, IL
Quick answer
This STUV 6 wood-burning insert installation in Hawthorn Woods upgraded an existing masonry fireplace with a manufactured wood-burning insert and a dedicated vent system. The original brick fireplace stayed in place: the new insert was set into the existing firebox, and the vent system runs up through the existing masonry chimney.
Project scope at a glance
- STUV 6 wood-burning fireplace insert
- Dedicated vent system
- Installation into an existing masonry fireplace
- Venting integrated with the existing masonry chimney
- Installation-preparation work included in the project
What Did the Existing Masonry Fireplace Need to Provide?
The existing masonry fireplace had to provide the opening and surrounding structure for the insert, while its chimney carried the new vent system. Instead of replacing the entire masonry feature, the STUV 6 installation used the existing fireplace opening and chimney as the setting for the new appliance and vent system.
First, the existing firebox needed to provide the physical space for the insert. Meanwhile, the chimney above had to accommodate the vent system that would serve the appliance.
That relationship makes an insert project different from simply placing a freestanding appliance in a room. The existing fireplace and the new system have to work together as one installation.
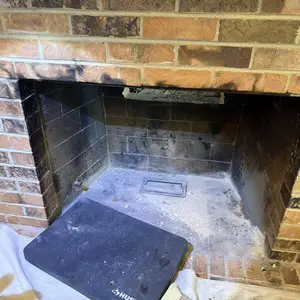
Photo 1 · Before: the original masonry firebox
The Fireplace Before the Insert Went In
The first selected photo shows the masonry firebox before the finished insert occupied the opening. Brick surrounds the original firebox, while the work area provides access for the new installation. Because this photograph comes from the actual Hawthorn Woods project, it also gives readers a useful reference point for the finished transformation later in the article.What Was Installed in This Hawthorn Woods Fireplace?
A STUV 6 wood-burning insert and its dedicated vent system were installed inside the existing masonry fireplace. Chimney Monkey set the appliance into the original firebox rather than removing the surrounding brick structure.
As a result, the completed fireplace combines a modern manufactured insert with the home’s established masonry surround and raised brick hearth.
The project scope also included the vent system as part of the same installation. Therefore, the finished appliance should be understood together with the venting components hidden behind and above it.
The Finished Insert Inside the Brick Fireplace
The second photo shows the finished STUV 6 from the living space. The black insert creates a distinct focal point, while the existing brick surround and hearth remain clearly visible around it. Compared with the open firebox shown earlier, this image makes the visual change easy to understand. However, the visible appliance represents only one part of the completed installation.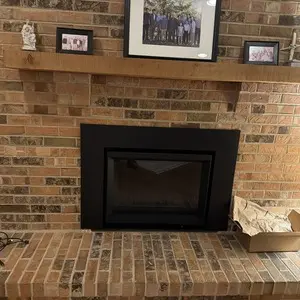
Photo 2 · After: the STUV 6 insert in the brick fireplace
Why Does a Wood-Burning Insert Need Its Own Vent System?
A wood-burning insert needs its own dedicated vent system so smoke travels from the appliance up the chimney through a continuous, connected pathway rather than the old open flue. The venting system becomes another major part of the project because it continues from the insert through the existing chimney.
In the project scope, the STUV 6 and vent system appear together as the primary installation. In addition, the project photographs document flexible metal venting within the chimney pathway.
Consequently, the existing masonry chimney continues to provide the surrounding structure while the dedicated vent system creates the pathway associated with the new insert.
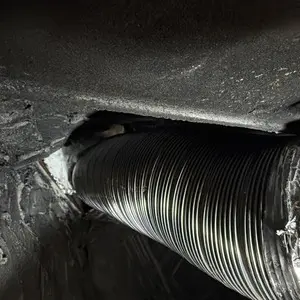
Photo 3 · Hidden work: flexible metal venting in the chimney
A Part of the Project Homeowners Usually Cannot See
The third image gives readers a close view of the flexible metal vent system inside the chimney. Once the insert is fully assembled, most of this component disappears from ordinary view. For that reason, installation photographs can add useful context. Instead of showing only the finished appliance face, they document part of the system that continues behind the fireplace and through the chimney.Where Does the Vent System End?
The vent system ends at an exterior termination at the chimney top, above the roof. To get there, it runs from behind the insert upward through the masonry chimney.
This exterior portion helps complete the visual story of the installation. First, the appliance sits inside the existing masonry fireplace. Next, the venting travels through the chimney. Finally, the system reaches the termination at the chimney top.
That sequence demonstrates why an insert project should be viewed as a complete appliance-and-vent installation rather than as one decorative change inside the room.
The Exterior End of the Venting Path
The fourth project photo shows the chimney-top area and the metal vent termination associated with the installation. The original masonry chimney remains visible around the new vent component. Meanwhile, the photograph also shows the broad concrete crown surrounding the flue area. Together, the image places the new venting within the existing exterior chimney structure.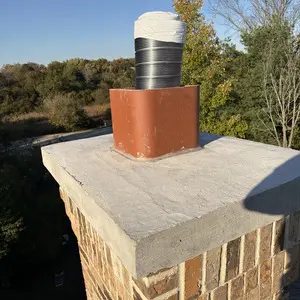
Photo 4 · Exterior: vent termination at the chimney top
What Installation Prep Work Was Included?
The project scope included a separate STUV 6 installation-preparation step to ready the existing fireplace for the insert. However, the individual preparation tasks were not itemized.
For accuracy, this recap does not list specific masonry modifications or other prep procedures beyond what the project documentation confirms.
Where Does the Insert Connect to the Vent System?
The insert connects to the vent system directly behind the appliance, so the connection stays hidden once the installation is finished. From the room, homeowners mainly see the finished insert face.
The fifth selected photo documents that concealed area. It shows the metal connection immediately behind the insert and gives readers another view of how the appliance connects to the venting system.
As a result, the project photographs provide both perspectives: the clean finished appearance from the room and the mechanical connection that sits out of sight during normal use.
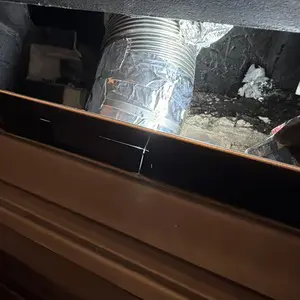
Photo 5 · Hidden work: the vent connection behind the insert
Documenting the Hidden Side of the Installation
This photo complements the finished fireplace image shown earlier. From the living room, the project looks clean and simple. Behind the appliance, the vent connection reveals another layer of the installation. Consequently, keeping project photos of concealed work can help explain what was installed even after those components are no longer readily visible.What Does Each Part of a STUV 6 Installation Do?
Each part of this STUV 6 installation has its own job, from the masonry opening that holds the insert to the termination at the chimney top.
| Project component | Role in this installation |
|---|---|
| Existing masonry fireplace | Provided the opening and surrounding structure for the insert. |
| STUV 6 insert | Became the new wood-burning appliance inside the existing firebox. |
| Vent system | Extended from the appliance area through the existing masonry chimney. |
| Installation preparation | Formed part of the documented project scope. |
| Exterior termination | Completed the visible vent pathway at the chimney top. |
Why Do Project Photos Matter for an Insert Installation?
Project photos matter because most of an insert installation, including the venting and its connection, is hidden once the work is done. This photo batch documents several stages and viewpoints that make the installation easier to understand.
First, the open masonry firebox establishes the starting point. Next, the finished appliance shows the visible transformation. Then, the liner and connection photos document hidden components within the system.
Finally, the chimney-top image completes the pathway outdoors. Together, those views connect the fireplace inside the home with the vent system traveling through the existing chimney.
What Do Homeowners Ask About STUV 6 Insert Installation?
Was the STUV 6 installed into an existing fireplace?
Yes. The STUV 6 wood-burning insert and its vent system were installed into the home’s existing masonry fireplace and chimney. The original brick firebox provided the opening for the insert, and the chimney above provided the pathway for the vent system, so the masonry fireplace did not have to be removed or rebuilt.
Was a vent system included with the installation?
Yes. The dedicated vent system was part of the primary installation scope alongside the STUV 6 insert. Project photos show flexible metal venting running through the existing masonry chimney and a metal connection directly behind the appliance. The insert and its venting work as one system, so they are planned and installed together.
Did the original brick fireplace remain visible?
Yes. The finished photos show the existing brick surround and raised brick hearth remaining visible around the black STUV 6 insert. Because the insert sits inside the original firebox, the home keeps its established masonry look while gaining a modern manufactured wood-burning appliance as the focal point of the room.
Did the project include installation preparation?
Yes. The project scope included a separate STUV 6 installation-preparation step to ready the existing fireplace for the insert. The individual prep tasks were not itemized, so this recap does not list specific masonry modifications. Prep for any insert project depends on the fireplace’s size and condition and on the manufacturer’s installation requirements.
Where does the vent system terminate?
The vent system runs from the connection behind the insert up through the masonry chimney to an exterior termination at the chimney top, above the roof. Project photos show the metal vent termination surrounded by the original chimney masonry and the broad concrete crown around the flue area.
Why does a wood-burning insert need its own vent system?
An insert sits inside a fireplace that was built for an open fire, and the original flue is often much larger than the insert needs. A dedicated, properly sized vent system connected to the insert gives smoke a continuous path up and out of the chimney. NFPA 211 and the insert manufacturer’s instructions set the venting requirements.
Can a wood-burning insert go into any masonry fireplace?
Not every fireplace is a fit. The firebox must be large enough for the insert, the hearth must provide the clearances the manufacturer requires, and the chimney must be able to hold the vent system. An inspection of the fireplace and chimney before installation confirms whether a specific insert, such as the STUV 6, will work.
How often should a wood-burning insert and chimney be inspected?
NFPA 211 calls for chimneys, fireplaces, and vents to be inspected at least once a year, with cleaning done as needed. For a wood-burning insert, the yearly visit checks the appliance, its connection, and the vent system up to the chimney-top termination, because most of those parts are hidden once the insert is installed.
What Does This STUV 6 Wood-Burning Insert Installation in Hawthorn Woods Show?
This STUV 6 wood-burning insert installation in Hawthorn Woods demonstrates how an existing masonry fireplace can become the structure for a complete fireplace-insert and venting project.
The documented work combined the STUV 6 appliance, its vent system, and installation preparation. Meanwhile, the project photographs show both the finished living-room appearance and the components hidden behind and above the insert.
Ultimately, the project is best understood as a complete system rather than one appliance placed inside a fireplace. The existing masonry opening, new insert, concealed venting, connection point, and exterior termination all form parts of the finished installation.
Standards referenced
The recommendations in this recap follow these published standards and guidance:
- STUV 6 installation manual: the manufacturer’s requirements for fitting the insert, hearth clearances, and the connected vent system.
- NFPA 211: Standard for Chimneys, Fireplaces, Vents, and Solid Fuel-Burning Appliances (inserts installed in masonry fireplaces, venting, and annual inspection).
- Chimney Safety Institute of America (CSIA): guidance on chimney inspections and venting for wood-burning inserts.
- UL 1777: Standard for Chimney Liners (listing for the metal vent liner run through the masonry chimney).
Not sure what service your home needs? Start with a professional evaluation so the system can be identified, the visible conditions can be documented, and the right next step can be recommended.
Have a question about your chimney, fireplace, venting system, gutters, or dryer vent? Schedule a professional visit and get clear recommendations based on the actual condition of your home.
Categories: Chimney Care Chimney Inspection Gas Appliance Installation Gas Fireplace Insert Maintenance Hawthorn Woods Lake County Illinois Local Services Wood-Burning Insert Installation