
Project recap · Utility venting
5-Inch Utility Flue Liner Installation in Mundelein
Chimney Monkey is a Buffalo Grove chimney and venting contractor, an NCSG member with a 4.9-star rating across 1,100+ reviews, serving Lake County and the North Shore.
Quick answer
This 5-inch utility flue liner installation in Mundelein gave a home’s gas-fired heating equipment a continuous stainless-steel vent path from the appliance connectors to the top of the chimney. The crew opened the lower chimney from the basement to make the connection, sealed it afterward, and capped the liner with a stainless-steel cap.
Project at a glance
- Service
- Utility flue relining
- Location
- Mundelein, Illinois
- Liner size
- 5-inch diameter
- Liner material
- Stainless steel
- Liner run
- Appliance connectors to chimney top
- Termination
- Stainless-steel cap
Documented project scope
- 5-inch stainless-steel utility flue liner
- Relining from the appliance vent connectors to the chimney top
- Basement chimney access for the liner connection
- Vent-connector work as needed
- Sealing of the access opening after installation
- Stainless-steel cap at the top of the lining system
Why Does Utility Flue Liner Sizing Matter?
A utility flue liner should match the appliance it serves, not simply fill the chimney. A utility chimney serves a different purpose from a wood-burning fireplace flue. Instead of carrying smoke from an open fire, it vents compatible gas-fired heating equipment through the masonry chimney.
However, the existing flue and the appliance connector are not always the same size. When a utility flue is too large for the exhaust entering it, the gases can cool before they leave the chimney. As a result, moisture can condense inside the flue and contribute to deterioration over time.
A correctly sized stainless-steel liner creates a more defined venting pathway. Therefore, liner selection depends on the actual equipment and venting requirements rather than on choosing the largest liner that will fit.
| Component | This project | Why it matters |
|---|---|---|
| Liner diameter | 5 inches | Sized to the venting needs of the connected gas-fired equipment, not to the largest liner that fits the flue. |
| Liner material | Stainless steel | Resists the moisture and corrosive by-products in gas-appliance exhaust. |
| Liner run | Continuous, from the appliance vent connectors to the chimney top | One sealed path, with no exhaust moving through the open masonry flue. |
| Appliance connection | Metal vent connectors, with old stack connectors replaced where needed | Carries exhaust from the heating equipment into the liner at the correct elevation. |
| Lower chimney access | Basement opening cut for the connection, then sealed | Lets the crew position and join the liner at the bottom of the chimney. |
| Termination | Stainless-steel cap | Keeps out rain, animals, and debris while leaving the vent open. |
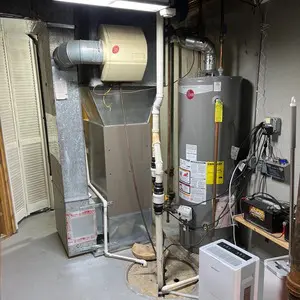
Photo 1 of 5
Start With the Equipment and Existing Vent Path
The first project photo shows the mechanical-room equipment and venting arrangement before focusing on individual components.
That broader view matters during a liner project. First, technicians confirm where the appliance exhaust begins. Next, they determine how the connectors enter the masonry chimney and where the new liner needs to connect.
How Was the New Liner Connected to the Heating Equipment?
The new liner was connected to the heating equipment through updated metal vent connectors that carry the appliance exhaust into the liner. The liner is only one part of the finished system, so that transition had to be right. For this project, the documented scope included the connections needed to route the heating-appliance vent through the new liner. In addition, the scope allowed old stack connectors to be replaced where needed.
Consequently, the installation addressed the full pathway from the appliance area instead of treating the liner as an isolated component.
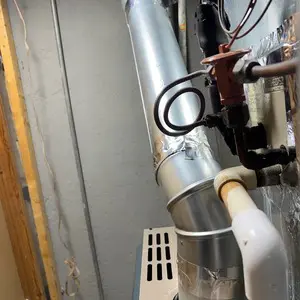
Photo 2 of 5
Connecting the Appliance to the New Liner
The second photo shows a closer view of the updated metal vent connector. This section forms the transition between the heating equipment and the utility flue inside the chimney.
Homeowners often focus on the liner hidden inside the masonry. Even so, the visible connector work remains an important part of the system, because exhaust must travel through each section before it reaches the termination.
Why Was Basement Access Needed During Relining?
Technicians often need an opening near the base of the chimney to connect the liner at the correct elevation. A masonry utility flue hides most of the liner inside the chimney structure, so direct access near the lower portion helps position and connect it properly.
The documented scope for this Mundelein project included cutting an access opening in the basement portion of the chimney when required. Once the connection work was complete, the scope also included sealing that opening. In other words, the opening was part of the installation process, not the finished condition of the chimney.
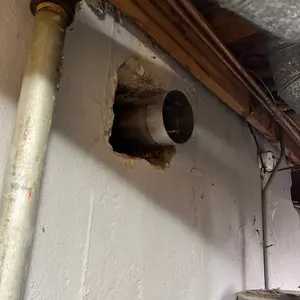
Photo 3 of 5
Accessing the Lower Chimney for the Connection
The third photo shows why this procedure can involve more than lowering a liner from the roof. The stainless-steel section must reach the appliance-side connection at the correct location inside the lower chimney.
Meanwhile, the opening gives technicians the working space to make that connection. Afterward, the access area is closed as specified in the project scope.
Why Use a Continuous Stainless-Steel Liner for a Utility Flue?
A continuous stainless-steel liner resists the moisture and corrosive by-products in gas-appliance exhaust and gives that exhaust one sealed path to the chimney top. In this project, the 5-inch stainless-steel liner runs continuously from the appliance vent connectors to the top of the chimney.
Therefore, the liner needs to provide a durable pathway through an environment that can be hard on unprotected masonry and older liner materials. Chimney Monkey’s furnace flue liner installation service similarly emphasizes correct sizing, corrosion resistance, and the relationship between the appliance and the flue.
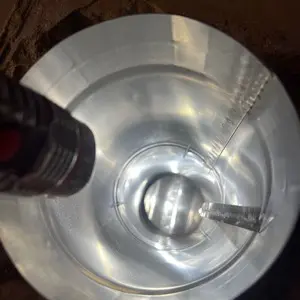
Photo 4 of 5
Looking Inside the New Stainless Liner
The fourth photo offers a view homeowners rarely see once the installation is complete. Looking into the new metal pathway makes the purpose of relining much easier to picture.
Instead of exhaust moving through the larger surrounding chimney space, the liner creates a defined vent from the appliance connection to the top termination.
How Does a Utility Liner End at the Chimney Top?
A utility liner ends at a cap that keeps weather and animals out while leaving the vent open to exhaust. For this project, the scope included a stainless-steel cap. It helps reduce entry from precipitation, animals, and outdoor debris while allowing the utility vent to terminate above the chimney.
This final component also shows how a liner project links work inside and outside the home. The job begins near the heating equipment and finishes above the roofline.
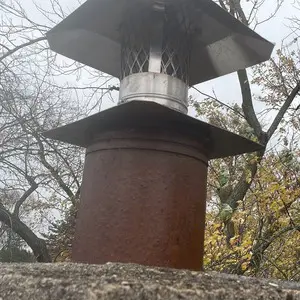
Photo 5 of 5
Completing the Venting System Above the Roof
The fifth photo completes the sequence by showing the termination above the masonry chimney. At this point, the lining system runs from the appliance area, through the chimney, and out to the exterior.
Likewise, the cap protects the open termination from direct weather and animal entry without closing the venting pathway.
What Are the Steps in a Utility Liner Installation?
A utility flue liner installation follows six stages, from identifying the vent system to capping the top.
- Identify the venting systemDetermine how the heating appliance connects to the existing chimney.
- Prepare lower accessReach the correct elevation for connecting the new utility liner.
- Install the linerCreate a continuous stainless-steel pathway through the chimney.
- Complete connector workJoin the appliance vent to the new lining system.
- Seal the access areaClose the temporary opening after the connection work is complete.
- Install the top capFinish the liner termination while helping keep weather and animals out.
Why Do Utility Chimneys Need Attention Without a Fireplace?
Utility chimneys work every time the furnace or other connected gas equipment runs, even though no fire is ever visible. That makes them easy to forget.
Over time, moisture and combustion by-products can affect the flue. In addition, replacing an appliance can change the amount and temperature of exhaust entering a chimney that was built for different equipment. For that reason, a liner evaluation looks at how the appliance and flue work together rather than assuming the original setup will always remain suitable. A routine chimney inspection is the usual starting point.
Project-specific note: The project documentation covers a 5-inch liner installation. It does not state the original flue dimensions or identify a specific failure mode, so those details should not be inferred from the installation scope alone.
What Did This Mundelein Utility Chimney Project Cover?
This project covered the full vent path, from the heating-appliance connections in the basement to the stainless-steel cap at the chimney top. Chimney Monkey completed this 5-inch utility flue liner installation at a home in Mundelein, Illinois, and the project photos document each stage of the work. The job did not start and end at the top of the chimney. Instead, it involved the appliance area, lower chimney access, the concealed flue, and the exterior termination.
Homeowners researching similar systems can explore related utility-venting services:
What Do Homeowners Ask About Utility Flue Liners?
What is a utility flue liner?
A utility flue liner creates a dedicated pathway through a chimney for compatible gas-fired heating equipment. Stainless steel is commonly used because the venting environment can contain moisture and corrosive combustion by-products.
Why does liner size matter?
The liner needs to match the venting requirements of the appliance or appliances it serves. An improperly sized flue can affect draft and the temperature of the exhaust as it travels through the chimney.
Why would technicians open the lower part of the chimney?
Access may be needed to position and connect the new liner at the proper elevation. Afterward, the opening can be sealed as part of the approved installation scope.
Does the liner connect directly to the appliance vent?
The installation includes the connector arrangement needed to transition from the compatible heating appliance into the new lining system. The exact configuration depends on the equipment and existing venting layout.
Why is a cap installed on a utility liner?
The cap completes the exterior termination while helping reduce entry from precipitation, animals, and debris. At the same time, it allows the venting pathway to remain open for appliance exhaust.
How often should a utility chimney be inspected?
NFPA 211 calls for chimneys, fireplaces, and vents to be inspected once a year, including flues that serve gas-fired heating equipment. Cleaning or repairs then follow what the inspection finds, and the inspection can confirm whether the liner still suits the appliance.
What Does This 5-Inch Utility Flue Liner Installation in Mundelein Show?
This 5-inch utility flue liner installation in Mundelein shows the full scope behind a completed utility-liner project. The work extended from the heating-appliance connections in the basement to the stainless-steel termination at the top of the chimney.
Along the way, the project required connector work, lower chimney access, a continuous stainless-steel liner, and an exterior cap. The photos document each major stage and make a mostly concealed chimney repair easier to understand.
Ultimately, utility-flue relining should follow the actual appliance and chimney configuration. A professional evaluation can determine whether an existing utility flue remains suitable or whether a correctly sized lining system makes sense for the home.
Standards referenced
The recommendations in this recap follow these published standards and guidance:
- NFPA 211: Standard for Chimneys, Fireplaces, Vents, and Solid Fuel-Burning Appliances (chimney liners and annual inspection).
- NFPA 54: National Fuel Gas Code (venting and vent sizing for gas-fired heating equipment).
- UL 1777: Standard for Chimney Liners (listing for stainless-steel relining systems).
- Chimney Safety Institute of America (CSIA): guidance on chimney inspections and relining flues for gas appliances.
- Liner and appliance manufacturer instructions: liner sizing, connections, and termination followed the listed liner system’s and the heating equipment’s installation requirements.
Not sure what service your home needs? Start with a professional evaluation so the system can be identified, the visible conditions can be documented, and the right next step can be recommended.
Have a question about your chimney, fireplace, venting system, gutters, or dryer vent? Schedule a professional visit and get clear recommendations based on the actual condition of your home.
Categories: Chimney Care Chimney Inspection Lake County Illinois Local Services Mundelein